Organizing Your Bottle Cap Collection with Custom Displays

A single dusty bottle cap sits in a junk drawer, tucked between a bent paperclip and a dead battery. It’s a small piece of metal, perhaps a vintage Coca-Cola-Cola or a local microbrewery find, but without a proper home, it's just clutter. This post explores how to transition from a pile of loose caps to a curated, professional-grade display using custom-built or specialized solutions. We’ll look at the best ways to categorize your finds, the materials you should use to prevent corrosion, and how to turn a shelf of "small things" into a centerpiece of your collection.
Collecting bottle caps is a tactile hobby. You feel the weight of the crimped edges and the texture of the printed graphics. But when you have hundreds of them, the sheer volume can become overwhelming. A disorganized pile leads to scratches and lost items. You want a display that highlights the art, not one that hides it under a layer of dust.
How Do I Organize a Large Bottle Cap Collection?
The best way to organize a large collection is by categorizing your caps into specific themes—such as brand, era, or color—before selecting a display method. If you just throw them in a box, you'll never find that one specific 1970s Budweiser cap again. A structured approach turns a heap of metal into an archive.
First, decide on your primary sorting method. Most collectors find success with one of these three categories:
- Brand/Manufacturer: Grouping by companies like Heineken, Guinness, or Coca-Cola. This is great for seeing the evolution of a brand's visual identity.
- Era/Vintage: Sorting by decades (e.g., 1950s vs. 1990s). This is vital if you are hunting for specific historical variations.
- Visual Aesthetic: Grouping by color or graphic style. This is more for the "art" side of collecting and looks much better on a wall.
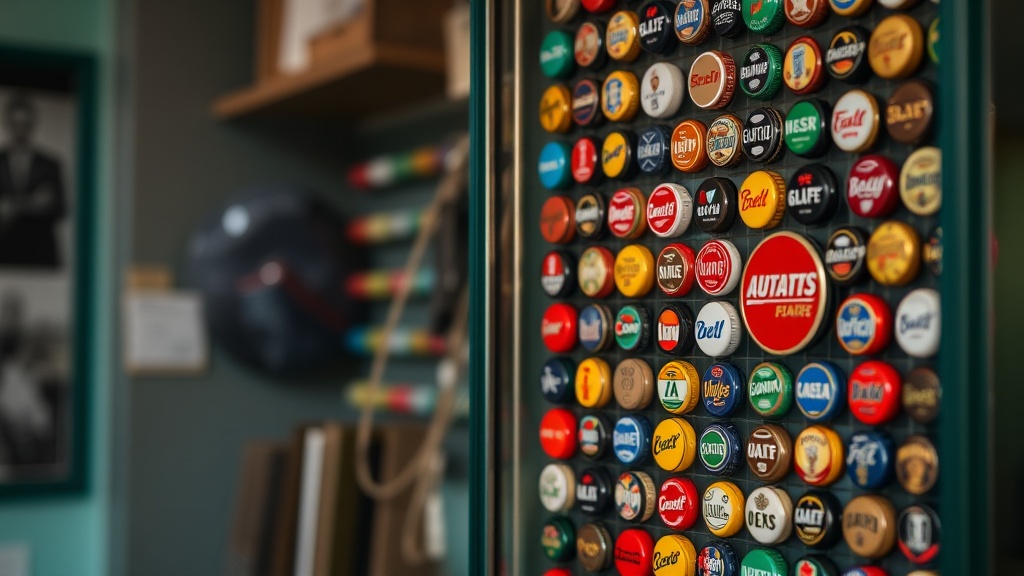
Once you've sorted them, you need a way to hold them. A simple shadow box is a classic choice, but if you have a massive collection, you might need something more robust. You could use a tiered acrylic stand or even a custom-built wooden rack. If you're dealing with more delicate items, remember that preserving the patina on metal collectibles is just as important as the display itself. You don't want a display that actually damages the items it's meant to showcase.
The Best Display Methods for Bottle Caps
There isn't a one-size-fits-all answer here. The "right" method depends on how much space you have and how much you want to interact with the pieces. Here is a breakdown of common display styles:
| Display Type | Best For | Pros | Cons |
|---|---|---|---|
| Shadow Boxes | Small to Medium Collections | Looks professional; easy to hang. | Limited depth for large volumes. |
| Acrylic Dividers | Large, High-Volume Collections | Highly visible; keeps items upright. | Can look a bit "plastic" or clinical. |
| Custom Wood Racks | Premium/Vintage Displays | High aesthetic value; very sturdy. | Expensive and hard to modify. |
| Magnetic Strips | Experimental/Modern Displays | Allows for easy removal. | Requires caps to be magnetic-compatible. |
If you're working with a very large collection, I've seen people use specialized "cap dispensers" often found in retail environments. These are great for high-frequency browsing, though they don't always look "pretty" in a home setting. It's a trade-off between utility and aesthetics.
What Materials Should I Use to Prevent Rust?
You should use non-reactive, moisture-controlled environments like acrylic, treated wood, or glass to prevent your metal caps from rusting. Metal is susceptible to oxidation, and if your display is sitting in a damp corner, your collection will suffer. This is especially true for vintage caps that may already have microscopic amounts of rust or compromised protective coatings.
Avoid using cheap, untreated plywood for your display bases. The acids in certain woods can react with the metal over time. Instead, opt for finished hardwoods or high-quality acrylic. If you are displaying these near a window, be careful. Just as you would avoid sunlight damage for enamel pins, you must protect your bottle caps from UV rays. Sunlight can fade the printed ink on the top of the cap, leaving you with a blank, useless piece of metal.
A quick tip: If you notice any signs of oxidation on your caps, don't just scrub them with water. You need a controlled approach. Use a dry, soft-bristled brush to remove dust. If you're worried about moisture, consider placing small silica gel packets (the kind you find in shoe boxes) inside your display cases. It’s a simple way to keep the humidity low without much effort.
The goal is to create a micro-environment. A sealed acrylic case is much better than an open shelf. It protects against dust, which is a major culprit in long-term metal degradation. Dust attracts moisture, and moisture causes rust. It's a cycle that's hard to break once it starts.
Step-by-Step: Building a Custom Shadow Box Display
If you're feeling a bit adventurous, building your own display is incredibly rewarding. It allows you to tailor the spacing to the specific size of your caps—whether they are standard crown caps or the larger, heavy-duty variety. Here is a basic workflow for a DIY enthusiast:
- Measure your "Hero" Caps: Not all caps are the same size. Measure your largest and smallest caps to ensure your spacing works for both.
- Select a Backing Material: A velvet or felt-lined back provides a high-end look and prevents the caps from rattling.
- Determine Fastening Methods: You can use small, clear adhesive dots, or even a thin bead of clear-drying museum wax. This keeps them in place without permanently damaging the metal.
- Test for Depth: Ensure the shadow box is deep enough so the glass doesn't touch the face of the cap. You want a small gap to allow for airflow.
One thing to keep in mind is the weight. A large collection of metal caps can actually get quite heavy. If you're mounting a large shadow box to a wall, make sure you're using appropriate hardware. Don't trust a simple command strip with a heavy, metal-filled display. It'll eventually fall, and that's a heartbreak no collector wants to experience.
Does the Type of Cap Affect the Display?
Yes, the type of cap—specifically whether it is a standard crown cap or a heavy-duty/specialty cap—will dictate how you mount it. Standard crown caps are lightweight and easy to secure with simple adhesive or friction, but heavier, specialty caps require more structural support to prevent sagging or falling.
Think about the weight distribution. If you are using a tiered acrylic stand, the heavier-duty caps should go on the bottom tiers. This keeps the center of gravity low and prevents the display from becoming top-heavy. If you're displaying "skulls" (the uniquely shaped caps used in certain niche breweries), you might need custom-sized holes or specialized grips to keep them upright.
I've seen many collectors make the mistake of treating all caps the same. But a lightweight soda cap and a heavy, thick-rimmed craft beer cap behave differently under gravity. If you're using a vertical display, that weight difference becomes very apparent. A "one size fits all" approach usually leads to a messy, tilted-looking display after a few months.
If you're serious about the long-term value of your collection, treat it like a museum piece. It's not just about looking cool; it's about preservation. A well-organized, protected, and properly displayed collection is much easier to maintain and much more enjoyable to show off to other enthusiasts.
Steps
- 1
Categorize by Era or Brand
- 2
Select a Mounting Surface
- 3
Secure the Caps Properly